Microservice Solution: Adding New Microservices
This document explains how to add new microservices to the microservice solution template. In the solution template, there is a folder named services in the root directory, which contains all the microservices in the solution. Each microservice is a separate ASP.NET Core application that can be developed, tested, and deployed independently.
Additionally, there is a folder named _templates in the root directory. This folder contains templates you can use to create new microservices, API gateways, and applications. These templates can be customized according to your needs.
Adding a New Microservice
To add a new microservice to the solution, you can use the service_nolayers template. This template creates a new ASP.NET Core application with the necessary configurations and dependencies. Follow the steps below to add a new microservice:
In ABP Studio Solution Explorer, right-click on the services folder and select Add -> New Module -> Microservice.
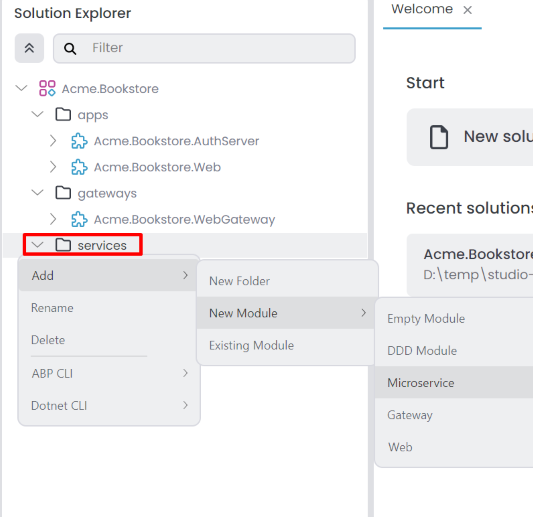
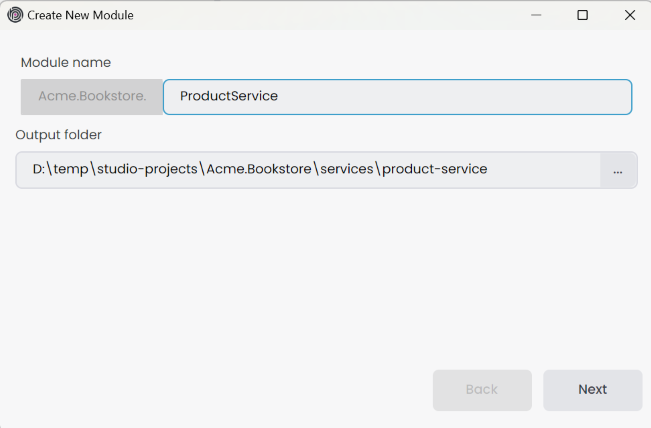
It opens the Create New Module dialog. Enter the name of the new microservice, specify the output directory if needed, and click the Next button. There is a naming convention: the Module name should include the solution name as a prefix, and the use of the dot (.) character in the Module name is not allowed.
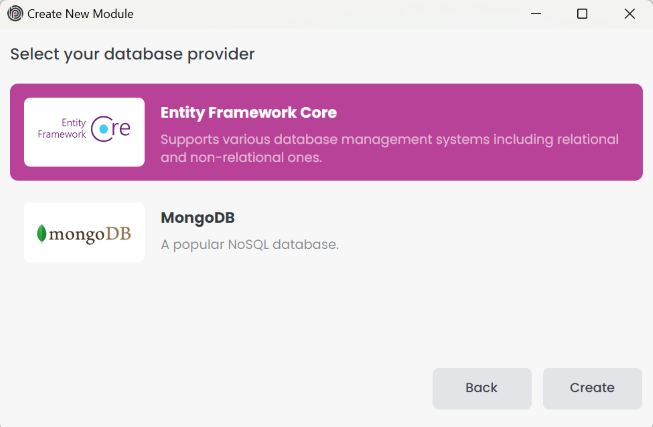
Select the database provider and click the Create button.
The new microservice is created and added to the solution. You can see the new microservice in the services folder.

Configuring the appsettings.json
The new microservice is created with the necessary configurations and dependencies. We should configure several sections by modifying the appsettings.json file:
- Set the
Administration&AbpBlobStoringconnection strings. - Set the correct
StringEncryptionkey. - Set the
CorsOriginsto allow the web gateway to access the microservice. - Set the
AuthServerconfigurations to enable the microservice to authenticate and authorize users.
You can copy the configurations from the existing microservices and modify them according to the new microservice. Below is an example of the appsettings.json file for the ProductService microservice.
{
  "ConnectionStrings": {
    "Administration": "Server=localhost,1434; User Id=sa; Password=myPassw@rd; Database=Bookstore_Administration; TrustServerCertificate=true",
    "AbpBlobStoring": "Server=localhost,1434; User Id=sa; Password=myPassw@rd; Database=Bookstore_BlobStoring; TrustServerCertificate=true",
    "ProductService": "Server=localhost,1434; User Id=sa; Password=myPassw@rd; Database=Bookstore_ProductService; TrustServerCertificate=true"
  },
  "App": {
    "CorsOrigins": "http://localhost:44333",
    "EnablePII": false
  },
  "Swagger": {
    "IsEnabled": true
  },
  "AuthServer": {
    "Authority": "http://localhost:44387",
    "MetaAddress": "http://localhost:44387",
    "RequireHttpsMetadata": "false",
    "SwaggerClientId": "SwaggerTestUI",
    "Audience": "ProductService"
  },
  "Redis": {
    "Configuration": "localhost:6379"
  },
  "RabbitMQ": {
    "Connections": {
      "Default": {
        "HostName": "localhost"
      }
    },
    "EventBus": {
      "ClientName": "Bookstore_ProductService",
      "ExchangeName": "Bookstore"
    }
  },
  "AbpDistributedCache": {
    "KeyPrefix": "Bookstore:"
  },
  "DataProtection": {
    "ApplicationName": "Bookstore",
    "Keys": "Bookstore-Protection-Keys"
  },
  "ElasticSearch": {
    "IsLoggingEnabled": "true",
    "Url": "http://localhost:9200"
  },
  "StringEncryption": {
    "DefaultPassPhrase": "PDAWjbshpwlOwNB6"
  }
}
Configuring the OpenId Options
We should configure the OpenId options by modifying the OpenIddictDataSeeder in the Identity service. Below is an example of the OpenIddictDataSeeder options for the ProductService microservice.
Create API scopes and add the required API scope for Swagger clients in the CreateApiScopesAsync and CreateSwaggerClientsAsync methods in the OpenIddictDataSeeder class.
private async Task CreateApiScopesAsync()
{
    await CreateScopesAsync("AuthServer");
    await CreateScopesAsync("IdentityService");
    await CreateScopesAsync("AdministrationService");
    await CreateScopesAsync("ProductService"); // new service
}

private async Task CreateSwaggerClientsAsync()
{
    await CreateSwaggerClientAsync("SwaggerTestUI", new[]
    {
        "AuthServer",
        "IdentityService",
        "AdministrationService",
        "ProductService" // new service
    });
}
Add the redirect URL for the new service in the CreateSwaggerClientAsync method.
private async Task CreateSwaggerClientAsync(string clientId, string[] scopes)
{
    ...
    ...
    ...
    var administrationServiceRootUrl = _configuration["OpenIddict:Resources:AdministrationService:RootUrl"]!.TrimEnd('/');
    var productServiceServiceRootUrl = _configuration["OpenIddict:Resources:ProductService:RootUrl"]!.TrimEnd('/'); // new service

    await CreateOrUpdateApplicationAsync(
        name: clientId,
        type:  OpenIddictConstants.ClientTypes.Public,
        consentType: OpenIddictConstants.ConsentTypes.Implicit,
        displayName: "Swagger Test Client",
        secret: null,
        grantTypes: new List<string>
        {
            OpenIddictConstants.GrantTypes.AuthorizationCode,
        },
        scopes: commonScopes.Union(scopes).ToList(),
        redirectUris: new List<string> {
            $"{webGatewaySwaggerRootUrl}/swagger/oauth2-redirect.html",
            $"{authServerRootUrl}/swagger/oauth2-redirect.html",
            $"{identityServiceRootUrl}/swagger/oauth2-redirect.html",
            $"{administrationServiceRootUrl}/swagger/oauth2-redirect.html",
            $"{productServiceServiceRootUrl}/swagger/oauth2-redirect.html", // new service
        }
    );
}
Add the allowed scope for the web (front-end) application(s) in the CreateClientsAsync method. You might have different clients for different UI applications such as web, Angular, React, etc. Ensure you add the new service to the allowed scopes of these clients.
private async Task CreateClientsAsync()
{
    var commonScopes = new List<string>
    {
        OpenIddictConstants.Permissions.Scopes.Address,
        OpenIddictConstants.Permissions.Scopes.Email,
        OpenIddictConstants.Permissions.Scopes.Phone,
        OpenIddictConstants.Permissions.Scopes.Profile,
        OpenIddictConstants.Permissions.Scopes.Roles
    };

    //Web Client
    var webClientRootUrl = _configuration["OpenIddict:Applications:Web:RootUrl"]!.EnsureEndsWith('/');
    await CreateOrUpdateApplicationAsync(
        name: "Web",
        type: OpenIddictConstants.ClientTypes.Confidential,
        consentType: OpenIddictConstants.ConsentTypes.Implicit,
        displayName: "Web Client",
        secret: "1q2w3e*",
        grantTypes: new List<string>
        {
            OpenIddictConstants.GrantTypes.AuthorizationCode,
            OpenIddictConstants.GrantTypes.Implicit
        },
        scopes: commonScopes.Union(new[]
        {
            "AuthServer",
            "IdentityService",
            "SaasService",
            "AuditLoggingService",
            "AdministrationService",
            "ProductService" // new service
        }).ToList(),
        redirectUris: new List<string> { $"{webClientRootUrl}signin-oidc" },
        postLogoutRedirectUris: new List<string>() { $"{webClientRootUrl}signout-callback-oidc" },
        clientUri: webClientRootUrl,
        logoUri: "/images/clients/aspnetcore.svg"
    );
}
Add the new service URL to the appsettings.json file in the Identity service.
"OpenIddict": {
  "Applications": {
    ...
  },
  "Resources": {
    ...
    "ProductService": {
      "RootUrl": "http://localhost:44350"
    }
  }
}
Configuring the AuthServer
We should configure the AuthServer for CORS and RedirectAllowedUrls.
"App": {
  "SelfUrl": "http://localhost:***",
  "CorsOrigins": "...... ,http://localhost:44350",
  "EnablePII": false,
  "RedirectAllowedUrls": "...... ,http://localhost:44350"
}
Configuring the API Gateway
We should configure the API Gateway to allow the web gateway to access the new microservice. First, we should add the ProductService sections to the appsettings.json file in the WebGateway project.
"ReverseProxy": {
    "Routes": {
      ...
      "ProductService": {
        "ClusterId": "ProductService",
        "Match": {
          "Path": "/api/productservice/{**catch-all}"
        }
      },
      "ProductServiceSwagger": {
        "ClusterId": "ProductService",
        "Match": {
          "Path": "/swagger-json/ProductService/swagger/v1/swagger.json"
        },
        "Transforms": [
          { "PathRemovePrefix": "/swagger-json/ProductService" }
        ]
      }
    },
    "Clusters": {
      ...
      "ProductService": {
        "Destinations": {
          "ProductService": {
            "Address": "http://localhost:44350/"
          }
        }
      }
    }
}
Afterwards, open the ProjectNameWebGatewayModule class in the WebGateway and add the ProductService to the ConfigureSwaggerUI method.
options.OAuthScopes(
    "AdministrationService",
    "AuthServer",
    "IdentityService",
    "ProductService" // new service
);
Configuring the UI Services
We should configure the UI application(s) to allow the new microservice to access through the web gateway. To do this, we should add the new service scope to the ConfigureAuthentication method in the ProjectName...Module class in the Web or Blazor application.
context.Services.AddAuthentication(options =>
{
	options.DefaultScheme = "Cookies";
	options.DefaultChallengeScheme = "oidc";
})
.AddCookie("Cookies", options =>
{
	options.ExpireTimeSpan = TimeSpan.FromDays(365);
})
.AddAbpOpenIdConnect("oidc", options =>
{
	...
	options.Scope.Add("AuthServer");
	options.Scope.Add("IdentityService");
	options.Scope.Add("AdministrationService");
	options.Scope.Add("ProductService"); // new servie
});
Similarly, if you have an Angular application, you should add the new service scope to the oAuthConfig in environment.ts:
const baseUrl = 'http://localhost:4200';

const oAuthConfig = {
  issuer: 'http://localhost:44387',
  redirectUri: baseUrl,
  clientId: 'Angular',
  responseType: 'code',
  scope: 'openid profile email roles AuthServer IdentityService AdministrationService ProductService', // new service
  requireHttps: false
};
Add the New Microservice to the Solution Runner
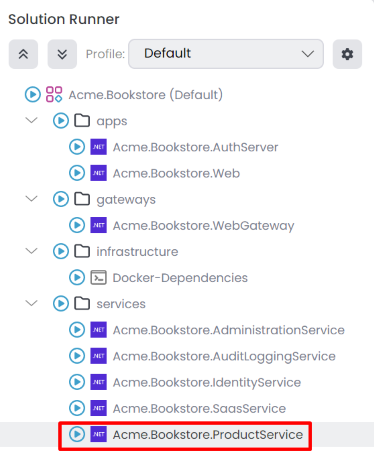
We should add the new microservice to the solution runner profile for running applications in the ABP Studio. You can follow the steps explained in the Solution Runner document to add the new microservice to the solution runner profile. Afterwards, you can start the new microservice by selecting it in the solution runner.
Docker Configuration for Prometheus
If you want to monitor the new microservice with Prometheus when you debug the solution, you should add the new microservice to the prometheus.yml file in the etc/docker/prometheus folder. You can copy the configurations from the existing microservices and modify them according to the new microservice. Below is an example of the prometheus.yml file for the ProductService microservice.
  - job_name: 'product'
    scheme: http
    metrics_path: 'metrics'
    static_configs:
    - targets: ['host.docker.internal:44350']
Creating Helm Chart for the New Microservice
If you want to deploy the new microservice to Kubernetes, you should create a Helm chart for the new microservice.
First, we need to add the new microservice to the build-all-images.ps1 script in the etc/helm folder. You can copy the configurations from the existing microservices and modify them according to the new microservice. Below is an example of the build-all-images.ps1 script for the ProductService microservice.
./build-image.ps1 -ProjectPath "../../services/product-service/Acme.Bookstore.ProductService/Acme.Bookstore.ProductService.csproj" -ImageName bookstore/productservice
Then, we need to add the connection string to the values.projectname-local.yaml file in the etc/helm/projectname folder. Below is an example of the values.bookstore-local.yaml file for the ProductService microservice.
global:
  ...
  connectionStrings:
    ...
    productService: "Server=[RELEASE_NAME]-sqlserver,1433; Database=Bookstore_ProductService; User Id=sa; Password=myPassw@rd; TrustServerCertificate=True"
Afterwards, we need to create a new Helm chart for the new microservice. You can copy the configurations from the existing microservices and modify them according to the new microservice. Below is an example of the productservice Helm chart for the ProductService microservice.
# values.yaml
image:
  repository: "bookstore/productservice"
  tag: "latest"
  pullPolicy: IfNotPresent
swagger:
  isEnabled: "true"

# Chart.yaml
apiVersion: v2
name: productservice
version: 1.0.0
appVersion: "1.0"
description: Bookstore Product Service

# product.yaml
apiVersion: apps/v1
kind: Deployment
metadata:
  name: "{{ .Release.Name }}-{{ .Chart.Name }}"
spec:
  selector:
    matchLabels:
      app: "{{ .Release.Name }}-{{ .Chart.Name }}"
  template:
    metadata:
      labels:
        app: "{{ .Release.Name }}-{{ .Chart.Name }}"
    spec:
      containers:
      - image: "{{ .Values.image.repository }}:{{ .Values.image.tag }}"
        imagePullPolicy: "{{ .Values.image.pullPolicy }}"
        name: "{{ .Release.Name }}-{{ .Chart.Name }}"
        ports:
        - name: "http"
          containerPort: 80
        env:
        - name: "DOTNET_ENVIRONMENT"
          value: "{{ .Values.global.dotnetEnvironment }}"
        - name: "ConnectionStrings__Administration"
          value: "{{ .Values.global.connectionStrings.administration | replace "[RELEASE_NAME]" .Release.Name }}"
        - name: "ConnectionStrings__AbpBlobStoring"
          value: "{{ .Values.global.connectionStrings.blobStoring | replace "[RELEASE_NAME]" .Release.Name }}"
        - name: "ConnectionStrings__ProductService"
          value: "{{ .Values.global.connectionStrings.productService | replace "[RELEASE_NAME]" .Release.Name }}"
          ...

# product-service.yaml
apiVersion: v1
kind: Service
metadata:
  labels:
    name: "{{ .Release.Name }}-{{ .Chart.Name }}"
  name: "{{ .Release.Name }}-{{ .Chart.Name }}"
spec:
  ports:
    - name: "80"
      port: 80
  selector:
    app: "{{ .Release.Name }}-{{ .Chart.Name }}"
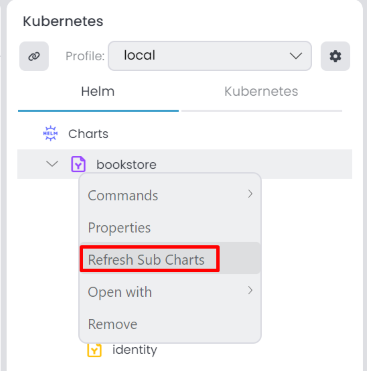
After creating the Helm chart, you can Refresh Sub Charts in the ABP Studio.
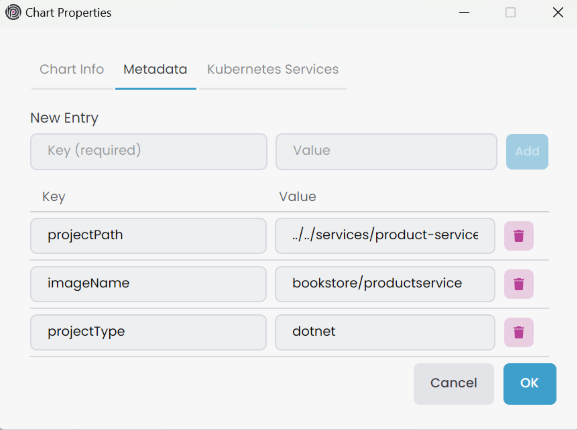
Then, update Metadata information right-click the microservicename sub-chart, select Properties it open Chart Properties window. You can edit in the Metadata tab.
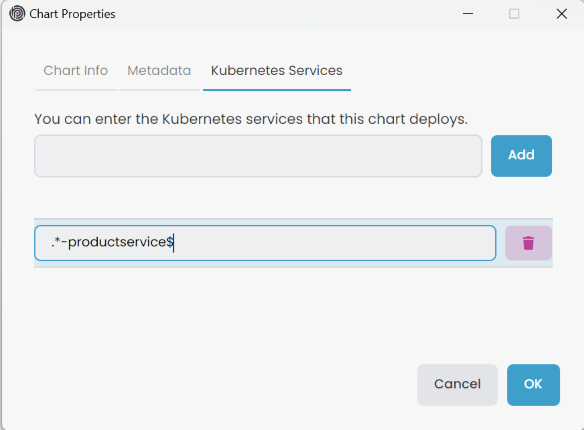
Add the Kubernetes Services in the Chart Properties -> Kubernetes Services tab.
Last but not least, we need to configure the helm chart environments for identity, auth-server, and gateway applications.
# identity.yaml
# Add this line to the "env:" section
- name: "OpenIddict__Resources__ProductService__RootUrl"
  value: "http://{{ .Release.Name }}-productservice"

# authserver.yaml
# Concat the following lines for "App__CorsOrigins" section
- name: "App__CorsOrigins"
  value: "...,http://{{ .Release.Name }}-administration,http://{{ .Release.Name }}-productservice"

# webapigateway.yaml
# Add this line to the "env:" section
- name: "ReverseProxy__Clusters__ProductService__Destinations__ProductService__Address"
  value: "http://{{ .Release.Name }}-productservice"
Customizing the Microservice Template
You can customize the microservice template if needed. Add new configurations, dependencies, or modules to the template by opening the _templates folder in the root directory and then the service_nolayers folder. Modify the service_nolayers template as required. The naming convention dictates that microservicename represents the name of the microservice when created. Use microservicename in the template files for dynamic naming. Existing service_nolayers template do not include the SaaS and Audit Logging modules by default. If creating a solution with these modules, add the necessary configurations to the service_nolayers template files.
Developing the UI for the New Microservice
After adding the new microservice to the solution, you can develop the UI for the new microservice. For .NET applications, you can add the microservice Contracts package to the UI application(s) to access the services provided by the new microservice. Afterwards, you can use the generate-proxy command to generate the proxy classes for the new microservice.
abp generate-proxy -t csharp -url http://localhost:44333/ -m productService --without-contracts
Next, start creating Pages and Components for the new microservice in the UI application(s). Similarly, if you have an Angular application, you can use the generate-proxy command to generate the proxy classes for the new microservice and start developing the UI.
abp generate-proxy -t ng -url http://localhost:44333/ -m productService
